
Yoga for pain relief has emerged as one of the most scientifically-backed approaches to managing chronic pain, offering both immediate comfort and long-term healing. Chronic pain affects over 50 million Americans, with back pain being the leading cause of disability worldwide. If you’re reading this, you’re likely among those seeking a natural, effective solution to manage your discomfort without relying solely on medications.
This comprehensive guide combines the expertise of two leading professionals: Dr. Sarah Mitchell, a Doctor of Physical Therapy with 15 years of experience in pain management, and Maya Patel, a Certified Yoga Instructor (CYT-500) specializing in therapeutic yoga. Together, they’ve created this evidence-based resource to help you find relief through the ancient practice of yoga.
What You’ll Learn in This Guide:
- The science behind how yoga combats pain
- Essential safety precautions for pain-relief yoga
- Targeted poses for yoga for back pain
- Specialized sequences for neck and shoulder tension
- Hip and knee-friendly poses for joint pain
- A complete 15-minute daily routine
- Expert answers to common questions
Expert Profiles
Dr. Sarah Mitchell, DPT
Doctor of Physical Therapy, Pain Management Specialist
Dr. Mitchell earned her Doctorate in Physical Therapy from the University of Southern California and has spent over 15 years helping patients overcome chronic pain through movement-based therapies. She specializes in integrating yoga principles with physical therapy protocols and has published research on the effectiveness of mind-body practices for pain management.
Maya Patel, CYT-500
Certified Yoga Instructor, Therapeutic Yoga Specialist
Maya completed her 500-hour yoga teacher certification with a focus on therapeutic applications. She has trained over 2,000 students in pain-relief yoga techniques and holds additional certifications in Yin Yoga and Trauma-Informed Yoga. Her approach emphasizes gentle, accessible practices that honor individual limitations while promoting healing.
The Science of Relief: How Yoga Fights Pain
Before diving into specific poses, it’s crucial to understand why yoga for pain relief is so effective. The benefits extend far beyond simple stretching:
The Physiological Mechanisms
Improved Blood Flow: Yoga poses increase circulation to affected areas, delivering oxygen and nutrients essential for tissue repair while removing metabolic waste products that contribute to pain.
Endorphin Release: The combination of movement, breath work, and mindfulness triggers the release of endorphins—your body’s natural painkillers that can be more effective than morphine.
Reduced Inflammation: Studies show that regular yoga practice decreases inflammatory markers like C-reactive protein and interleukin-6, which are directly linked to chronic pain conditions.
Postural Realignment: Many pain conditions stem from poor posture and muscle imbalances. Yoga systematically addresses these issues by strengthening weak muscles and lengthening tight ones.
Mind-Body Connection: The meditative aspects of yoga help break the pain-stress cycle by activating the parasympathetic nervous system, reducing cortisol levels and promoting healing.
Research Spotlight: A 2017 study published in the Annals of Internal Medicine found that yoga was as effective as physical therapy for treating chronic lower back pain, with benefits lasting at least one year.
Safety First: Essential Precautions Before You Begin
This section reviewed by Dr. Sarah Mitchell, DPT
Your safety is paramount when using yoga for pain management. Follow these expert-approved guidelines:
Critical Safety Points:
• Listen to Your Body: Pain is your body’s warning system. Sharp, shooting, or sudden pain means stop immediately
• Avoid Forcing Poses: Never push through pain or force your body into positions that cause discomfort
• Consult Your Healthcare Provider: Always check with your doctor before starting any new exercise program, especially if you have chronic pain conditions
• Start Slowly: Begin with gentle poses and gradually increase intensity as your body adapts
• Use Props: Blocks, straps, and bolsters aren’t signs of weakness—they’re tools for safe practice
• Modify Everything: Every pose can be adapted to your current abilities and limitations
• Stay Hydrated: Proper hydration supports tissue health and recovery
When to Seek Medical Attention:
- Pain that worsens during or after practice
- New numbness or tingling
- Loss of function or mobility
- Signs of serious injury (inability to bear weight, severe muscle spasms)
Yoga for Pain Relief: Core Routine for General Back Pain
Back pain is the most common reason people turn to yoga, and for good reason. These poses target the primary causes of back discomfort: tight hip flexors, weak core muscles, poor spinal mobility, and muscle imbalances.
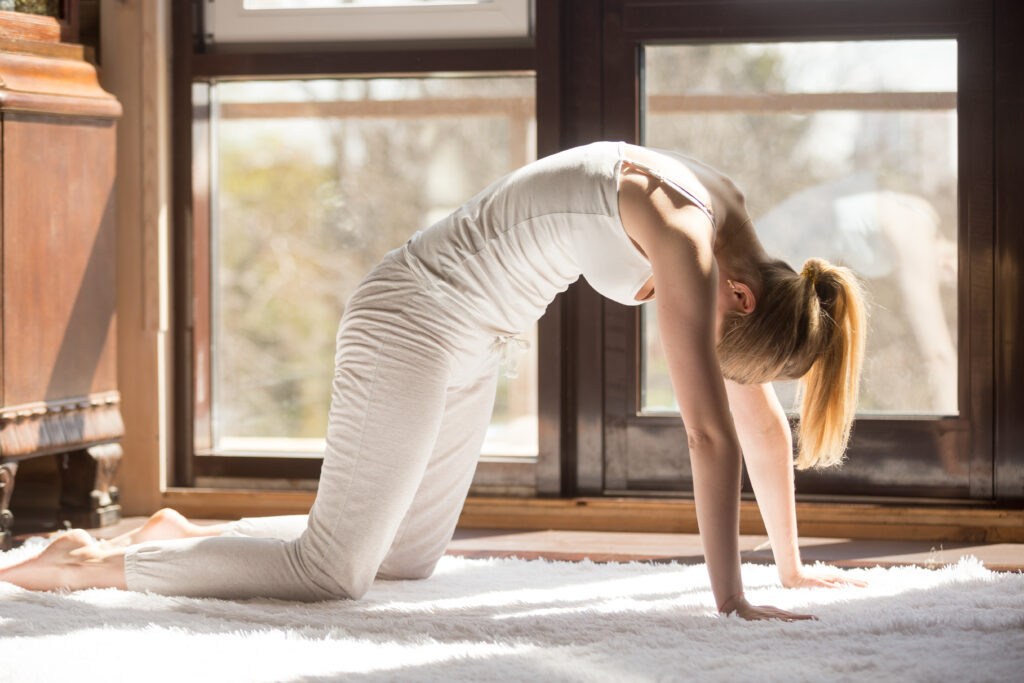
1. Cat-Cow Pose (Marjaryasana-Bitilasana)
What it is & Why it works: This gentle flowing movement mobilizes the entire spine while strengthening the core and improving coordination between breath and movement.
Step-by-Step Instructions:
- Start on hands and knees in tabletop position
- Inhale, arch your back and lift your chest (Cow)
- Exhale, round your spine toward the ceiling (Cat)
- Continue for 8-10 slow, mindful repetitions
- Focus on moving one vertebra at a time
Expert Tip from Maya: “Focus on synchronizing your breath with the movement. The breath is what transforms this from mere exercise into therapeutic yoga.”
Physical Therapist’s Note from Dr. Mitchell: “This is excellent for spinal mobility, but avoid pushing into any painful range of motion. The movement should feel like a gentle massage for your spine.”
2. Downward-Facing Dog (Adho Mukha Svanasana)
What it is & Why it works: This foundational pose lengthens the entire posterior chain (back of the body) while strengthening the arms and shoulders, creating space in the spine.
Step-by-Step Instructions:
- Start in tabletop position
- Tuck your toes under and lift your hips up and back
- Straighten your legs as much as comfortable
- Press firmly through your hands
- Hold for 30 seconds to 1 minute
- Pedal your feet to release calf tension
Expert Tip from Maya: “If your hamstrings are tight, keep a generous bend in your knees. The goal is length in the spine, not straight legs.”
Physical Therapist’s Note from Dr. Mitchell: “This pose creates beneficial traction in the spine. If you have wrist issues, use blocks or come onto your forearms instead.”
3. Child’s Pose (Balasana)
What it is & Why it works: A restorative pose that gently stretches the lower back while promoting relaxation and stress relief.
Step-by-Step Instructions:
- Kneel on the floor with big toes touching
- Separate your knees as wide as comfortable
- Sit back on your heels
- Fold forward, extending arms in front or alongside your body
- Rest your forehead on the ground or a block
- Hold for 1-3 minutes, breathing deeply
Expert Tip from Maya: “Place a bolster or pillow under your torso for extra support. This should feel completely restful.”
Physical Therapist’s Note from Dr. Mitchell: “This pose activates the rest-and-digest response, which is crucial for healing. It’s also excellent for decompressing the spine after other poses.”
4. Sphinx Pose (Salamba Bhujangasana)
What it is & Why it works: A gentle backbend that strengthens the back muscles while promoting the natural curve of the lumbar spine.
Step-by-Step Instructions:
- Lie on your belly with legs extended
- Place forearms on the ground, elbows under shoulders
- Press forearms down and lift your chest
- Keep your neck neutral and shoulders away from ears
- Hold for 30 seconds to 1 minute
- Lower slowly and rest
Expert Tip from Maya: “Imagine lengthening through the crown of your head rather than lifting higher. Quality of alignment matters more than depth.”
Physical Therapist’s Note from Dr. Mitchell: “This pose helps restore the natural lumbar curve, which is often lost in people who sit frequently. Start with just a few seconds if you’re new to backbends.”
5. Supine Twist
What it is & Why it works: A gentle twisting motion that releases tension in the lower back and improves spinal rotation.
Step-by-Step Instructions:
- Lie on your back with knees bent, feet flat
- Extend arms out to form a T-shape
- Drop both knees to one side
- Keep shoulders grounded
- Hold for 1-2 minutes, then switch sides
- Use a pillow between your knees for comfort
Expert Tip from Maya: “Don’t worry about getting your knees to the floor. Let gravity do the work while you breathe and release.”
Physical Therapist’s Note from Dr. Mitchell: “Twisting poses help hydrate the spinal discs and can provide immediate relief for lower back tension. Move slowly and avoid forcing the twist.”
Yoga for Pain Relief: Neck & Shoulder Tension Release
Neck and shoulder tension often result from forward head posture, stress, and prolonged computer use. These poses specifically target the muscles that become tight and weak in these conditions.
Seated Neck Stretches
What it is & Why it works: Simple, accessible stretches that can be done anywhere to release neck tension and improve mobility.
Step-by-Step Instructions:
- Sit tall with shoulders relaxed
- Gently drop your right ear toward right shoulder
- Hold for 30 seconds, feeling the stretch along the left side
- Slowly roll your chin toward your chest
- Lift and repeat on the left side
- Finish with gentle chin tucks (5-10 repetitions)
Expert Tip from Maya: “Use your breath to deepen the stretch. As you exhale, allow yourself to release a little more tension.”
Physical Therapist’s Note from Dr. Mitchell: “These stretches target the upper trapezius and levator scapulae—the muscles most commonly tight in people with neck pain.”
Thread the Needle Pose
What it is & Why it works: This pose releases tension between the shoulder blades while gently twisting the thoracic spine.
Step-by-Step Instructions:
- Start in tabletop position
- Slide your right arm under your left arm
- Lower your right shoulder and temple to the ground
- Keep your left hand planted or rest it on your back
- Hold for 1-2 minutes, then switch sides
- Return to tabletop between sides
Expert Tip from Maya: “This is one of the most effective poses for computer neck. Focus on breathing into the space between your shoulder blades.”
Physical Therapist’s Note from Dr. Mitchell: “This pose addresses the thoracic rotation that’s often lost with forward head posture. It’s particularly beneficial for people who work at desks.”
Eagle Arms
What it is & Why it works: Stretches the upper back and shoulders while improving posture and reducing tension.
Step-by-Step Instructions:
- Sit or stand with spine straight
- Wrap your right arm under your left at the elbows
- Bring palms together if possible (or grab opposite shoulders)
- Lift elbows slightly and pull hands away from face
- Hold for 30 seconds, then switch arm positions
- Feel the stretch between your shoulder blades
Expert Tip from Maya: “If you can’t bring palms together, simply grab your shoulders. The key is feeling the stretch across your upper back.”
Physical Therapist’s Note from Dr. Mitchell: “This pose specifically targets the rhomboids and middle trapezius, which are often weak in people with rounded shoulder posture.”
Yoga for Pain Relief: Soothing the Hips & Knees
Hip and knee pain often interconnect, as tight hips can contribute to knee problems and vice versa. These poses address both areas while promoting overall lower body health.
Bound Angle Pose (Baddha Konasana)
What it is & Why it works: Opens the hips and groin while promoting healthy circulation to the pelvic region.
Step-by-Step Instructions:
- Sit with the soles of your feet together
- Hold your feet or ankles gently
- Sit up tall through your spine
- Gently draw your heels closer to your pelvis
- Hold for 1-3 minutes, breathing deeply
- You can add a gentle forward fold if comfortable
Expert Tip from Maya: “Sit on a blanket or bolster to elevate your hips. This makes the pose more accessible and comfortable.”
Physical Therapist’s Note from Dr. Mitchell: “This pose helps maintain hip flexibility, which is crucial for healthy knee function. Never force the knees down—let them relax naturally.”
Bridge Pose (Setu Bandhasana)
What it is & Why it works: Strengthens the glutes and hamstrings while opening the hip flexors, creating better alignment for both hips and knees.
Step-by-Step Instructions:
- Lie on your back with knees bent, feet hip-width apart
- Arms alongside your body, palms down
- Press through your heels and lift your hips
- Keep knees parallel and engage your glutes
- Hold for 30 seconds to 1 minute
- Lower slowly, vertebra by vertebra
Expert Tip from Maya: “Focus on lifting from your glutes, not your lower back. This protects your spine while building strength where you need it most.”
Physical Therapist’s Note from Dr. Mitchell: “Bridge pose is excellent for counteracting the effects of prolonged sitting. It strengthens the posterior chain while opening the hip flexors.”
Reclining Hand-to-Big-Toe Pose (Supta Padangusthasana)
What it is & Why it works: Stretches the hamstrings and calves while maintaining spinal alignment, reducing stress on the lower back and knees.
Step-by-Step Instructions:
- Lie on your back with both legs extended
- Draw your right knee toward your chest
- Loop a strap around the ball of your right foot
- Straighten your right leg as much as comfortable
- Keep your left leg grounded and active
- Hold for 1-2 minutes, then switch sides
Expert Tip from Maya: “Keep a micro-bend in the lifted leg if your hamstrings are tight. The goal is length, not a perfectly straight leg.”
Physical Therapist’s Note from Dr. Mitchell: “Using a strap allows you to work within your range of motion safely. Tight hamstrings contribute to both lower back and knee pain, so this pose addresses multiple issues.”
Putting It All Together: Your 15-Minute Daily Pain Relief Routine
Consistency is more important than perfection. This routine combines the most effective poses from each section into a flowing sequence that you can practice daily.
The Complete 15-Minute Sequence
| Pose | Duration | Focus Area | Key Benefits |
|---|---|---|---|
| Cat-Cow Pose | 1 minute | Spine mobility | Warms up the spine, coordinates breath |
| Downward Dog | 1 minute | Full back stretch | Lengthens posterior chain, builds strength |
| Child’s Pose | 2 minutes | Rest and restoration | Decompresses spine, promotes relaxation |
| Seated Neck Stretches | 2 minutes | Neck and shoulders | Releases upper body tension |
| Thread the Needle | 2 minutes (1 min each side) | Shoulder blades | Improves thoracic mobility |
| Bridge Pose | 1 minute | Hip strength | Strengthens glutes, opens hip flexors |
| Bound Angle Pose | 2 minutes | Hip flexibility | Opens hips and groin |
| Reclining Hand-to-Big-Toe | 2 minutes (1 min each side) | Hamstring flexibility | Reduces lower back strain |
| Supine Twist | 2 minutes (1 min each side) | Spinal rotation | Releases lower back tension |
Practice Tips:
- Morning: Focus on gentle movements to prepare your body for the day
- Evening: Hold poses longer to release accumulated tension
- Modification: Reduce hold times when starting out, gradually building up
- Props: Use blocks, straps, and bolsters to make poses accessible
- Breath: Maintain steady, deep breathing throughout
Frequently Asked Questions (FAQ)
How often should I do yoga for pain relief?
For chronic pain management, consistency is key. Start with 15 minutes daily, focusing on quality over quantity. As your body adapts, you can increase duration or frequency. Most people see improvements within 2-4 weeks of regular practice.
Dr. Mitchell’s Note: “Daily gentle practice is more beneficial than occasional intense sessions. Your nervous system needs consistent input to create lasting changes.”
Can yoga make my pain worse?
While yoga is generally safe, improper practice can aggravate existing conditions. This is why it’s crucial to:
- Start slowly and listen to your body
- Avoid poses that cause sharp or shooting pain
- Work with qualified instructors when possible
- Modify poses to suit your current abilities
Maya’s Insight: “Pain during yoga should never be sharp or sudden. You should feel sensation and gentle stretching, but never true pain.”
What’s the difference between yoga and stretching?
While both involve physical movement, yoga integrates breath, mindfulness, and philosophy. This mind-body connection activates healing mechanisms that simple stretching doesn’t access. Yoga also includes strengthening elements and promotes better body awareness.
Do I need any special
ChatGPT a dit :
equipment?
You can start with just a yoga mat, but these props enhance comfort and accessibility:
- Yoga blocks: Support poses and bring the floor closer
- Strap: Extend your reach in poses
- Bolster or pillow: Add comfort to resting poses
- Blanket: Provide warmth and support
Conclusion: Your Path to Natural Pain Relief
Yoga for pain relief offers a scientifically-backed, holistic approach to managing chronic pain. By combining the physical benefits of improved flexibility and strength with the mental benefits of stress reduction and mindfulness, yoga addresses pain from multiple angles.
Remember these key takeaways:
- Consistency trumps intensity
- Listen to your body
- Patience is essential
- Safety first